Showing posts with label craft. Show all posts

the all-seeing door

A few weeks after move in day, we received a package of boxes at our doorstep. They sat on the dining floor about a week before I opened them. They were padded boxes for a receiver from the previous owners I guess. And there they sat, on my dining room floor, for forever it seemed. I would always forget to take them with us when we recycle on the weekends and I was just tired of seeing them there. So, unpretty.
One weekend morning, Andrew woke up talking about eye-clops because he had finally seen the inside of the boxes. I've no idea what the child really meant, but it ignited a genius idea in my head. Why not make something out of them? And what better way to reuse such useless things than to decorate my house with them for Halloween?
So I introduce you the All-Seeing front door of the Witty house!
Like I seriously threw out the boxes and did. not. take a picture to show you these boxes. I've never seen any like it. I just spent 15 minutes searching for a pic of what one would look like. But no. Only the weird happens to me. 
But imagine a box full of these blue squishy, half-spheres surrounding each of sides of the box. It would be fun to walk on them if they covered my floor. 
And since they were all blue, I imagined it was ok to spray paint some green and yellow to change up the iris a bit. Then, I cut out a circle from a flat piece of cardboard and used it as a stencil to make the black part (pupil). Andrew helped me with this project so it was pretty easy.  
Next, I cut out 10-inch circles from white cardstock and glued the eyeballs on to them. 
And then came the installation. The boys loved sticking them onto the door with my perfect guidance for their layout. Because if they had any say in it, there would be random eyeballs all throughout the house. No thanks, guys. 
The boys brag to everyone they see (even strangers) about the eyeballs on our front door. Everyone that has come to the house has raged about them too. I think they're pretty great. Not bad for a free Halloween project, huh? 
The house even has magical Halloween powers, you guys! It makes cobwebs complete with its own spiders! 
And you guys, nobody is more critical about my front steps than me (I?) But to put it in perspective, we've only been here 4 months and eventually the time will come when the front door gets a good makeover.
Can you say green door and freshly stained steps? I sure can.
Halloween is coming! And this week I finish our costumes. Yes, we will ALL be going as something this year and I can't wait to show you! 
post signature

Pop Show re-cap and My Birthday

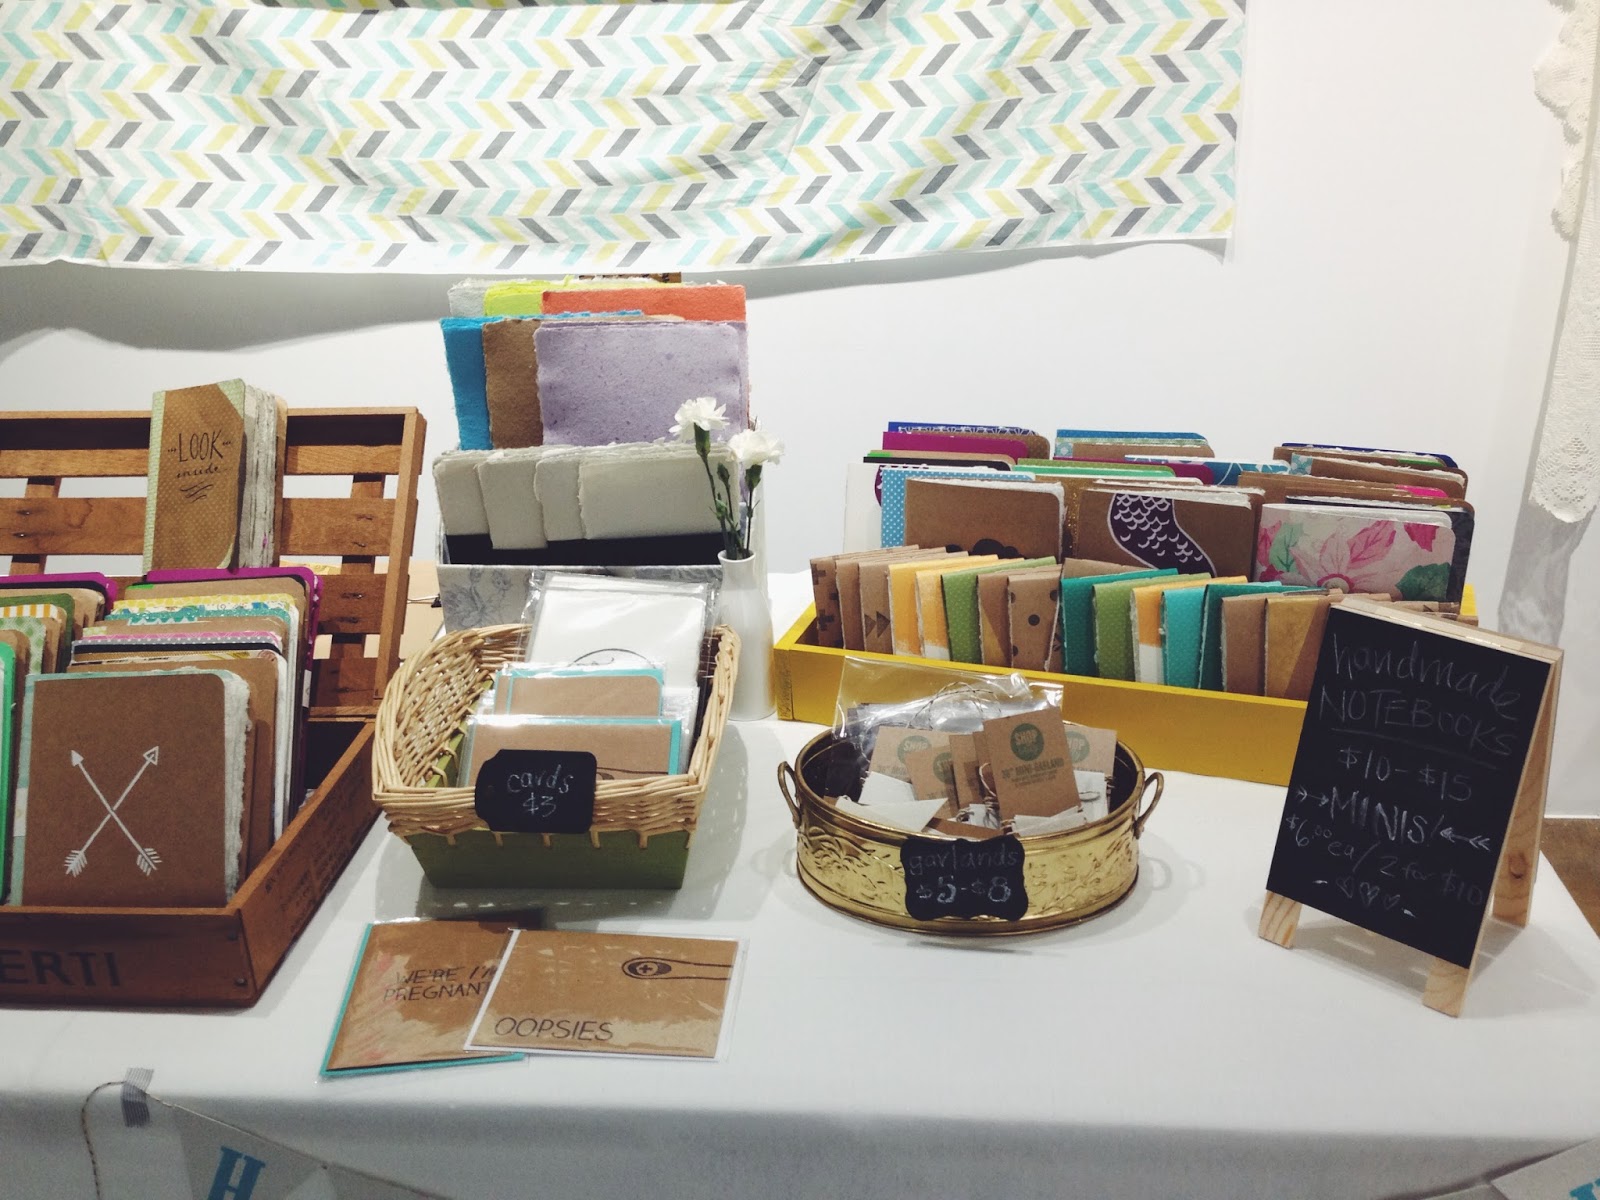
This past weekend we were at Silver Street Studios in Downtown Houston for Pop Shop Houston. It was a pretty amazing experience, to say the least!I met so many other makers, purchased & bartered some goodies and had a pretty kickin' experience with Elena. She was a great selling tool, drawing in all sorts of customers. 
We also found out what people really like and what we don't need to worry about making anymore... which in my opinion it is such valuable information if we want to expand Shop Witty!
We were told by several people that our display rocked, and that made me so relieved since I had felt our West Elm set up was less showy and lame (although still having great sales). 
You see? Everyone loved her and she loved everyone!
We kept her carseat under the table...she didn't know any better :)
Top to bottom, L to R: cute free crafts I made, our new product (will be on etsy soon-ish), Whovian geek alert goodies, and beautiful hand-painted paper that I hope to collaborate with the girl who makes it (her style is amazing!)
Anyways, my birthday is in two days. I will be 30. I hope to accomplish the things I mentioned in my blog post a year ago, but if not, it's cool. I mean life is life and it changes...as long as I get a great margarita, eat some cake and spend it with my family, I WILL BE HAPPY. Not about being 30, good gracious no, but that I had a great time. Anndddd I'm still wanting that tattoo. Don't get me wrong about that. 

IT. WILL. HAPPEN. someday. 

Happy Hump Day (and happy birthday to my young (ish) sister, te quiero mucho werita)

post signature

Easy Halloween Treat: mummy juice box

I've seen on Pinterest a lot cute little things that parents do for their kids' lunchbox. I'm not all about the Bento Box craze, thank goodness, because that takes real 'art-manship' not to mention patience.
I rather go the super easy cute route because let's be honest, how much do kids really appreciate your handiwork in their lunchbox? They're just gonna pick at it and eat it...besides, my mom never packed that lunch like that and I grew up totally fine without that luxury.
But I did end up seeing these on Pinterest and immediately thought, hey, I'm willing to do these! 
so I did. like 3 days in a row because they kept begging for them. the first time I made it, Andrew thought I had not given him an apple juice in his lunchbox and went without a drink all day at school. silly kid. when he got home, I had to show him it was truly his juice box and that he could drink it. maybe I should have explained it to him instead of saying, hey I put a surprise in your lunchbox today! 
To Make Them: all you need is a juice box {duh}, athletic tape, googly eyes, and a sharpie. but remember to detach the straw before you wrap it! I re-attached the straw to the back of the juice box with some more athletic tape. 
Andrew decided to decorate his own. he added a third eye and made a 'ghost' mouth. he loves those juice boxes.
we aren't trick-or-treating this year. we will hopefully go to the Children's Museum about 30 mins away in hopes that it will replace the 10 lbs of candy we would most likely get if we did go trick-or-treating...
me no likey that. why does it have to be candy!? why can't it be like craft kits or granola bars? 
ugh, i can't stand candy anymore...even Andrew's school decided to give out treat bags full of candies last week at his open house. they asked parents to 'donate' it. and guess what I said? would you like a notebook & a pencil instead? :) yeah, i'm one of those parents. 
happy halloween, you guys! 
post signature

A Halloween Wreath

Today is about a quick Halloween-y wreath!
A small wreath which I wrapped in striped fabric, a glittery $1 skull from Dollar Tree, a huge green bow from a plastic table cover and a simple contrasting orange bow...
I quite like it! At night, the boys beg me to turn on the skull which has a tiny little light inside its head and flashes different colors. For a dollar, that was a total bonus.
The wreath was inspired by this one which unfortunately does not have a proper website credit {if you are the owner of that image, please let me know!}
Have a great week!
post signature

Preparing for Halloween

We've had this little skeleton body for a while. Last year, we got an oversized pumpkin and he just kinda looked odd.
Then, we got two small pumpkins that the kids decorated and then it was a two-headed skeleton pumpkin. Kids didn't care though. They were proud of their work!
This year, however, I decided that I was tired of this poor little guy not being used for his full potential and I warned the kids that Mom's pumpkin was going to be his head this year. Not theirs. I think I might have hurt their feelings, but I don't care....Mr. Skeleton looks so great!
The white pumpkins were the rage this year and I thought maybe I should just pay $2 extra and get it. And I'm glad I did. No orange pumpkins heeerre! 
I was inspired by the movie Nightmare Before Christmas and my "Anything Skullified" Pinterest board
I grabbed my trusty acrylics and paintbrushes and got to work. It was pretty fun!
Plus, you know how much more awesome this little guy is? I can use him for Dia de los Muertos and I am ever so excited about that....
Now, when they boys walk to the front door, they don't fight about whose pumpkin get to be the head.
This momma reigns on Halloween! 
post signature

new season: football {a craft}

you guys, i've become a widow. and it's all because football season is here. husband being a coach, requires him long days on those practice and game fields with a whole buncha testosterone filled bodies and no time for Lynet-lovin'.
my saturdays are now filled with college football {go Aggies--whoop} and i'm ok with that {at least, until Christmas} anything past that, is just a plea to make it all stop. and i miss him. but you know what? he likes doing that stuff. so i won't act a fool and just let him do his own thing. i know he will come back to me, someday.
meanwhile, tis the season to start decorating the house with football, fall, and {squeal} halloween themes!
I wanted this garland to support husband and also be fun for the kids, but i made the mistake of doing this almost at the end of the day where little boys were just wanting to watch their tv show and be goofy.
so I ended up doing most of the craft...but still. I like the way it looks and only cringe a little bit seeing their footballs don't match mine perfectly {don't judge, it's the artist in me}.
so there you have it, now i just need to start making some lil' smokies + some chili with jalapeños + chug that cold beer....errr. wait. not fair. #pregnant
i am still a little let down by this weather, wishing it was a bit cooler, but i'm so used to it. this is Texas after all. it doesn't get cold until january, really...i tried wearing a hipster scarf the other day and was just a big no-no in this humid weather {felt like someone was chocking me and that is my least favorite thing}. how much am i willing to sacrifice comfort for style? obviously not that much. 
happy weekend guys! get your football on! 
post signature

handmade paper

UPDATE: We know have a shop with our own handmade paper. Click HERE to visit.

For some crazy reason, the hubs decided that he needed to make paper. Just like he gets excited about organizing his movie collection or building Excel spreadsheets, I just have to go with the flow.
After all, when one gets a surge of "I have to do this..." there's no one that can stop you, right?
So he looked up how to make paper out of paper on the internet. This is where blogs and how-to tutorials are so great on the internet. When ya don't know how to do it, Google it.

He cut up his newspapers, put them in a blender with some warm water, and spread them out over a screen  from our window and spread the slush out over it. 
You're really supposed to use a deckle (pictured below) but didn't feel like taking the extra time to run and get supplies...
Source


 Then it was time to soak up the water with some felt and sponges and a rolling pin...
...and lay flat to dry.
 We literally don't know anything about making paper, this is our first test run.
Newspaper, we're learning, is pretty ugly looking, all grey and lifeless looking.
AND, as it turns out, it clumps--a lot. So we have to really smooth it out with the rolling pin and make it really thin.
 Gary tried experimenting with bleaching out the mush and adding dye to it, but it doesn't come out very well either. The yellow paper is the one that we tried bleaching and dying and you can see how it didn't take the color so well. 
 And even after letting them dry completely, and pressing them for a 12-24 hour period, they begin to wave and warp again. 
 For now, this is an experiment for us. It was fun to do for a Sunday afternoon though. And we don't have quite the space needed to lay out more than 4 sheets of paper at once. 
Ultimately to make better looking paper, we will need better quality used paper and refine our technique with the proper tools. 
Then I get to draw on them!!!